- Created by Pavel Golubnichiy, last modified on Jun 05, 2023
You are viewing an old version of this page. View the current version.
Compare with Current View Page History
« Previous Version 4 Next »
User console
Access to resources is performed using the user console. Available at the following URL:
- https://pam.domain.local/pam/uc
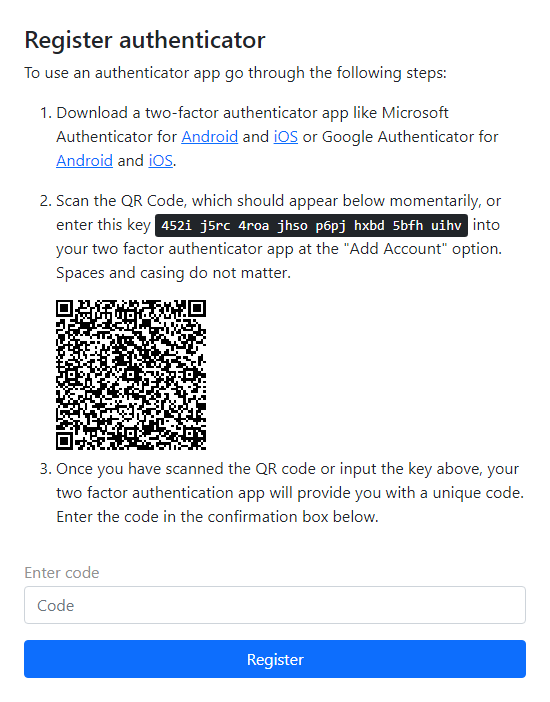
Register authenticator
To work with the user console, you must register the authenticator. Log in to the console, if the user does not have an authenticator, then he will be redirected to IDP to register him:

After successful registration, you will be redirected to the user console.
If the attempts to enter the wrong OTP code are exceeded, the user is blocked for 15 minutes.
For urgent unblocking, the PAM Administrator must reset the authenticator to the locked user.
Access to the resource
The console displays permissions to access to resources. For each permission, a resource, connection type, connection address and privileged account are indicated. Sorting is available for each column. As you enter characters in the search box, matches will be displayed across all columns.

Access to resources is performed using .rdp files. To download the file, you must click Connect to the right of the required permission or click Connect to the access gateway. The second connection option is convenient with a large number of permissions, since it allows you to select the desired resource after authentication.
The permission details show the validity period, access schedule, and permission ID (the sequential number of the permission in the Permissions section in the Management console).
Direct connection to the resource
- Click Connect to the right of the desired permission
- Run the RDP file to access the resource
- Authenticate and follow the steps to set up your connection
Connection to the access gateway
- Click Connect to access gateway
- Run the RDP file to connect to the gateway.
- Authenticate and follow the steps to set up your connection.
Connection to SSH Proxy
You can use any SSH client to connect to the SSH Proxy gateway.
- Start SSH client
- Enter the SSH Proxy address and connect
- Authenticate
- Select a resource to connect
Connect via SSH directly
Each SSH connection has a Copy button in the user's console. After clicking, you will copy the complete connection string and can use it in the SSH client.
Command template for connecting directly to a resource via an ssh client:
ssh [user-name]#[resource]#[account-name]#[reason]@[proxy-address]
- user-name - username
- resource - IP address/DNS name of the target resource
- account-name - name of the privileged account
- reason - text of the reason for the connection
- proxy-address - IP address/DNS SSH Proxy
If the reason contains spaces, then it should be quoted. If any of the parameters are not specified, then SSH Proxy will additionally request the necessary information.
After executing the command, SSH Proxy will ask for the user's password and TOTP.
Example:
ssh james.miller#ubuntu#webmaster#"system configuration"@pam
SCP or SFTP file transferring
To transfer files using the SCP or SFTP protocol, use the corresponding built-in OS utility. WinSCP, OpenSSH, PSCP, PSFTP are also suitable for Windows. Use the standard command to copy, but instead of the resource address, specify the address of the SSH Proxy:
scp -r C:\temp\configs\ james.miller@sshproxy.indeed-id.local:/tmp
Pass the PAM authentication, then select the resource number for file transfer.
For WinSCP, you need to create a new connection, specify the PAM username and SSH Proxy connection address. During the connection, a list of available resources will be displayed. After selecting a resource in the right panel, the tree of the resource's file system will open.
Executing commands with root privilege
To execute commands with root privilege, the pamsu command is used similarly to sudo. The difference is that authentication will be requested from the PAM user, and not by the privileged account.
The command with arguments must be preceded by two hyphens. For example:
[administrator@centos7su ~]$ pamsu -- ls -la /etc/ssl
Password for indeed-id\victor.osipov:
total 12
drwxr-xr-x. 4 root root 68 Sep 22 19:20 .
drwxr-xr-x. 75 root root 8192 Sep 22 17:49 ..
drwxr-xr-x. 2 root root 123 Sep 22 19:30 CA
lrwxrwxrwx. 1 root root 21 Sep 22 15:51 cert.pem -> /etc/pki/tls/cert.pem
lrwxrwxrwx. 1 root root 16 Nov 23 2020 certs -> ../pki/tls/certs
[administrator@centos7su ~]$
[administrator@centos7su ~]$ pamsu vi /etc/resolv.conf
View account password and SSH key
If the user has permission, in which the option Allow user to view account credentials is enabled, then the Accounts section will become available in the personal account. The section displays all accounts for which the password and SSH key can be viewed. To view, click View credentials, enter the reason for viewing and confirm your actions.
The PAM administrator can configure confirmation to view the password of a privileged account, in which case the user will wait for confirmation.
End of session
To end the session, end the user's session on the resource, or close the remote connection window.
Desktop console
To start Desktop Console utility, make sure you are logged on with Active Directory account (otherwise, run Desktop Console utility as an Active Directory user account), double-click the Indeed Identity PAM Desktop Console shortcut, PAM authentication window appears. Register or enter TOTP code. After successful authentication you will see the available resources in the Connections pane.
To open connection double-click the desired resource (also you can right-click it and chose Connect menu item) and complete the authentication. You can open multiple connections at the same time.

End of session
To end the session, end the user's session on the resource, or right-click on resource in the Connections pane or on connection tab and select Disconnect menu item, or close the Remote Desktop window.

- No labels