Make managed
Bulk account management
- Mark one or several accounts in the Accounts section and click Make managed.
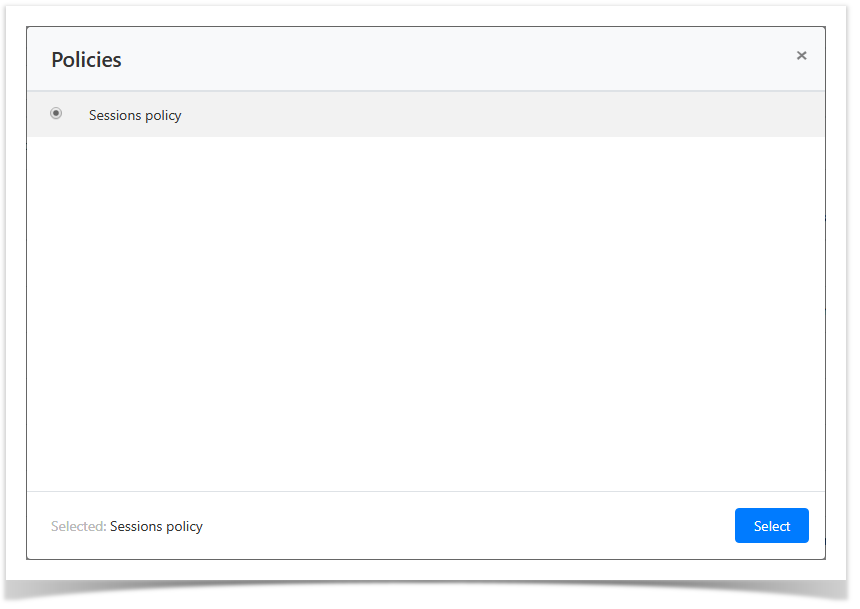
- Choose the session policy.
Confirm the action by clicking Make managed
Сделать УЗ управляемой
Массовое управление УЗ
- В раздел Учётные записи отметьте одну или несколько учётных записей и нажмите Сделать управляемой.
- Выберите политику сессий.
Подтвердите свои действия нажав Управлять.

Note icon false Массовое управление учётными записями может быть выполнено только при наличии сервисного подключения на тех ресурсах или доменах, чьи учётные записи выбраны для управления, так как для каждой будет сгенерирован случайный пароль.
Управление УЗ из её профиля
Bulk account management can be performed only if there is a service connection on those resources or domains whose accounts are selected for management, since a random password will be generated for every account.
Warning icon false SSH keys are not generated or set with bulk management.
Account management from its profile
- Switch to the Accounts section and search for the required account.
- Open the account profile and click Make managed.
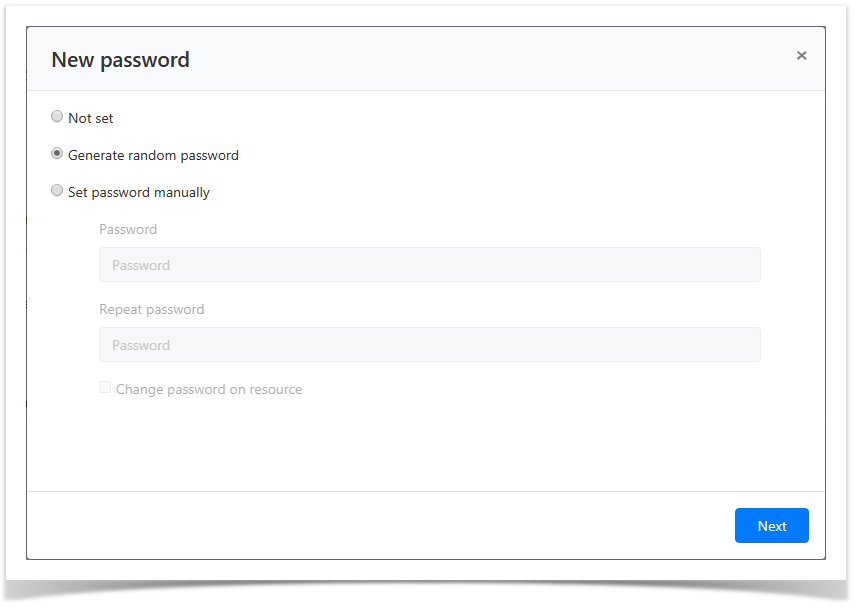
- Select one of the password setting:
Not set
- Перейдите в раздел Учётные записи и выполните поиск.
- Перейдите в профиль учётной записи и нажмите Сделать управляемой.
- Выберите политику сессий.
- Выберите одну из опций для установки пароля:
Не задавать
Note icon false Если ресурс, на котором находится учётная запись имеет тип пользовательского или сервисного подключения SSH, то при установке пароля будет доступна опция Не задавать, её выбор позволит перейти к установке SSH-ключа без генерации или ввода пароля.
- Сгенерировать случайный пароль
This option is only available if user or service SSH connection is used, as this connection type allows for account storage with SSH key only. If Not set option is selected, then you should set a SSH key for the account.
Generate random password
Set password manually + Change password for resource
Задать пароль вручную + Изменить пароль на ресурсеNote icon false Опции Сгенерировать случайный пароль или Задать пароль вручную + Изменить пароль на ресурсе могут быть использованы только при наличии сервисного подключения. Если выбрана опция Задать пароль вручную без Изменить пароль на ресурсе, то пароль учётной записи будет изменён только в Indeed PAM.
Options Generate random password or Set password manually + Change password for resource can only be used with service connection. If Set password manually option is selected, and Change password for resource is not, then the account password is changed in the Indeed PAM only.
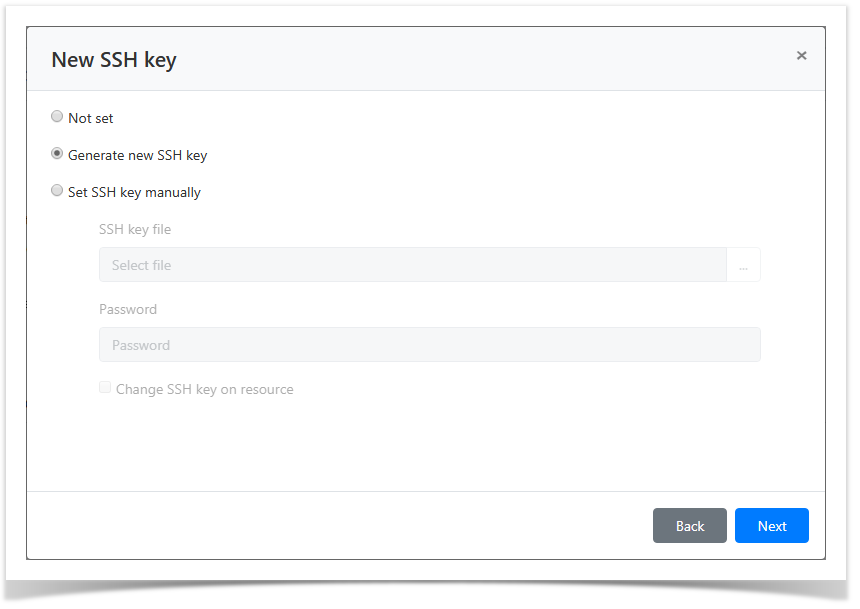
- Select one of the SSH key setting options: :
Not set
Не задавать
Note icon false Если для учётной записи установлен пароль, то при установке SSH-ключа будет доступна опция Не задавать, её выбор позволит позволит пропустить шаг установки SSH-ключа.
- Сгенерировать новый SSH ключ
If password is set for the account, then SSH key setting makes Not set option available. If selected, the SSH key setting step can be skipped.
- Generate new SSH key
Set SSH key manually + Change SSH key for resource
Задать SSH ключ вручную + Изменить SSH ключ на ресурсеNote icon false Опции Сгенерировать новый SSH ключ или Задать SSH ключ вручную + Изменить SSH ключ на ресурсе могут быть использованы только при наличии сервисного подключения. Если выбрана опция Задать SSH ключ вручную без Изменить SSH ключ на ресурсе, то SSH-ключ учётной записи будет изменён только в Indeed PAM.
- Выберите политику сессий.
Options Generate new SSH key or Set SSH key manually + Change SSH key for resource can only be used with service connection. If Set SSH key manually option is selected, and Change SSH key for resource is not, then the account SSH key is changed in the Indeed PAM only.
- Choose the session policy.
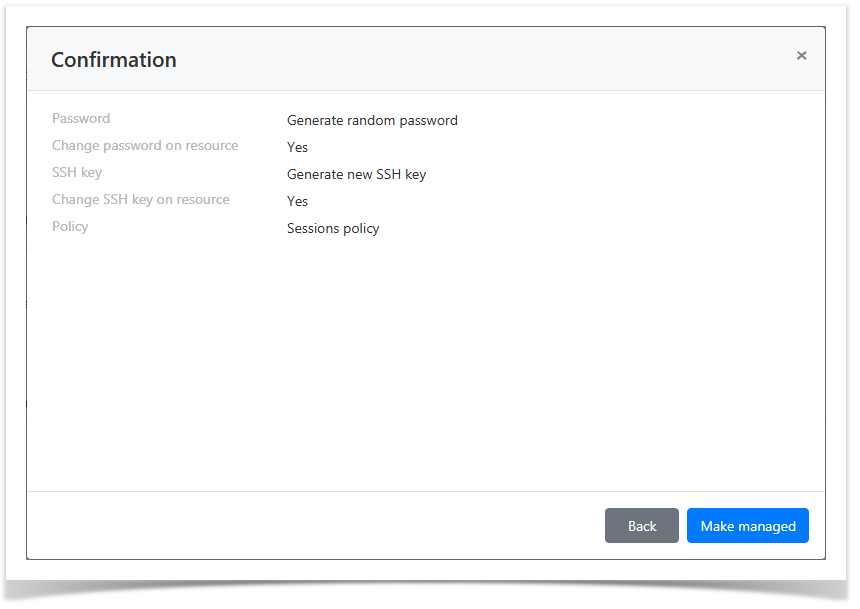
Look through the account parameters again and click Make managedОзнакомьтесь с деталями учётной записи и нажмите Сохранить.
Note icon false Если необходимо изменить параметры учётной записи, то вы можете вернуться на любой шаг нажав Назад.
Игнорирование
Откройте профиль учётной записи и нажмите Игнорировать.
Во всех разрешениях учётная запись будет отмечена как Игнорируется (![]() ).
).
Блокировка
Для приостановки действия разрешений, в которых используется учётная запись необходимо открыть её профиль и нажать Блокировать.
Во всех разрешениях учётная запись будет отмечен как Заблокированная (![]() ).
).
Удаление
Удаление из раздела Учётные записи
В разделе Учётные записи отметьте одну или несколько учётных записей и нажмите Удалить.
Удаление из профиля Учётной записи
Откройте профиль учётной записи и нажмите Удалить.
Восстановление
- Откройте профиль учётной записи и нажмите Сделать управляемой.
- Отметьте в списке политику сессий.
Скриншот - Отметьте пункт Сгенерировать случайный пароль или Задать пароль вручную и введите пароль.
Скриншот
| icon | false |
|---|
If you need to modify the account parameters, simply click Back to return to the required step.
Ignoring
Ignored accounts are marked with ![]() symbol in the Account section. Their profiles contain service message that states - Account is ignored.
symbol in the Account section. Their profiles contain service message that states - Account is ignored.
| Warning | ||
|---|---|---|
| ||
If the account is used in permissions and is transferred to the Ignored state, all permissions will be revoked. When the account is transferred to the Managed state, its permissions will not be restored. |
Bulk account ignoring
- Mark one or several accounts in the Accounts section and click Ignore.
- Confirm the action by clicking Ignore again.
Account ignoring from its profile
- Switch to the Accounts section and search for the required account.
- Open the Account profile and click Ignore.
- Confirm the action by clicking Ignore again.
Blocking
Bulk account blocking
- Mark one or several accounts in the Accounts section and click Block.
- Confirm the action by clicking Block again.
Account blocking from its profile
- Switch to the Accounts section and search for the required account.
- Open the Account profile and click Block.
- Confirm the action by clicking Block again.
Removing
Bulk account removal
- Switch to Accounts section and mark one or several accounts.
- Click Remove. Confirm the action by clicking Remove again.
Account removal from its profile
- Switch to the Accounts section and search for the required account.
- Open the Account profile and click Remove.
- Confirm the action by clicking Remove again.
Restoring
- Switch to the Accounts section and click Extended search. Файлы
- Enter the account name and select Removed state.
- Select the account Location, click Ok, then Search:
- Resources
To search, enter Resource name or Address (DNS name/IP address) completely or partially. - Domains
To search, enter domain NetBIOS or DNS name completely or partially.
- Resources
- Open the account profile and click Restore.
Select the restore point and click Next.

Note icon false If the Sessions policy that was on the account has been removed, a new sessions policy should be specified after selecting the recovery point.
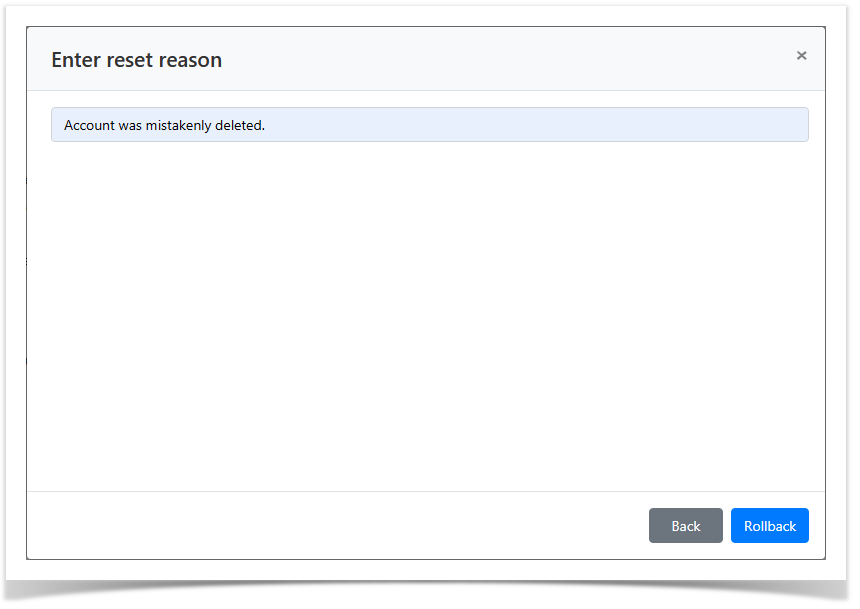
- Specify the reset reason and click Rollback.
| Backtotop | ||||
|---|---|---|---|---|
|
| Divbox | ||||
|---|---|---|---|---|
| ||||
|