- Created by Vladislav Fomichev, last modified by Liliya Morozova on Nov 20, 2025
Files of Axidian Access Manager Server Server reside in: axidian AM\Axidian Access Manager Server\<Version number>\
- AxidianAM.Server-x64.msi is installation package of Axidian AM.
- /Misc/Templates folder contains policy templates.
- /Misc/AM.KeyGen.exe is the utility to generate encryption keys.
- /Misc/AccessControlInitialConfig/EA.Server.AccessControlInitialConfig.exe is the initial configuration utility.
- /Misc/AccessControlInitialConfig/EA.Server.AccessControlInitialConfig.exe.config is the file to setup the configuration utility.
- /Misc/AM.Config.Encryptor/EA.Config.Encryptor.exe is the utility to encrypt the configuration file.
- /Misc/AM.Config.Encryptor/EA.Config.Encryptor.exe/encryptConfigs.bat is the script to encrypt all the sections of configuration file.
- /Misc/AM.Config.Encryptor/EA.Config.Encryptor.exe/decryptConfigs.bat is the script to decrypt all the sections of configuration file.
Installation
Once the Axidian AM server has been installed, you will be prompted to configure settings by using a configuration wizard. To do this, please do not disable the option Run Axidian EA Setup Wizard.
- Install the Axidian AM by running AxidianAM. Server-x64.msi installer.
Add HTTPS binding in Default Web Site settings of IIS Manager.
Axidian AM is a web application on the basis of IIS. “Require SSL” is a default installation setting, which, in turn, requires active HTTPS binding.
If you do not plan to use HTTPS protocol, then deactivate SSL requirement in IIS settings for am/core and in the server configuration file (C:\inetpub\wwwroot\am\core\Web.config). To do so, change the value of "requireHttps" parameter to "false".
<appSettings> <add key="requireHttps" value="false" /> </appSettings>
- Run IIS Manager and expand the Sites item.
- Select the Default Web Site site and click Bindings item in the Actions section.
- Click Add:
- Type - https.
- Port - 443.
- Select the SSL Certificate.
- Save the binding.
How to use the configuration wizard to customize the settings
The configuration wizard be launched automatically after Axidian AM Server installation, unless disabled by the user. To launch the wizard manually, execute this file: C:\Program Files\Axidian EA\Wizard\EA. Server.Wizard.exe.
The wizard includes automatic data checks. If the data has been entered correctly, the field will be highlighted in green, meaning that you can proceed to the next step. Incorrect entries will be highlighted in red, meaning that you can only proceed to the next step after inserting correct data.
- At the Before You Start step, click Next.
- At the Restore Settings step, click Next.
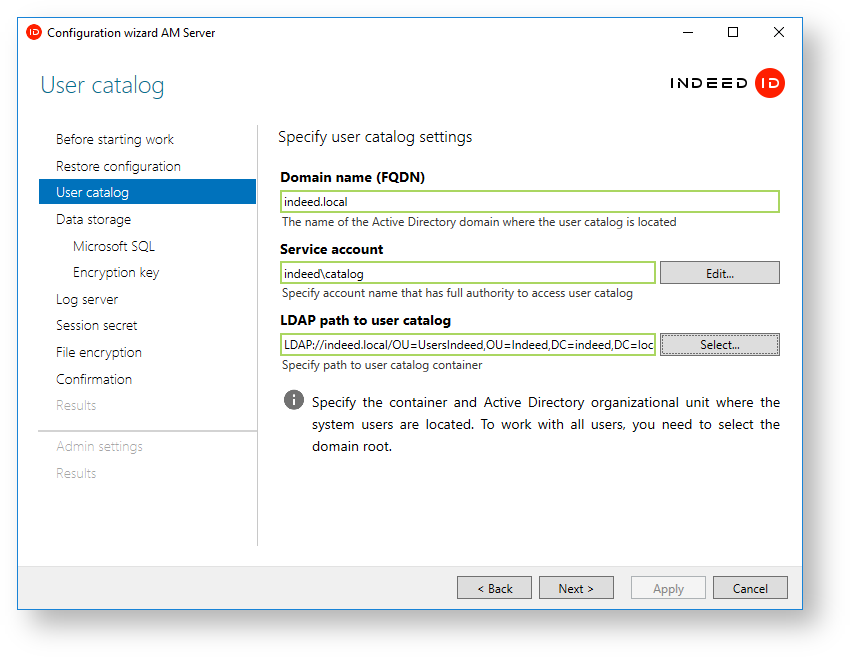
- Please set the following parameters, at the User Directory step:
- Domain name (FQDN) − specify full domain name, for example, domain.local.
- Service user account − specify the service user account with access rights to the user directory.
- Click the Edit button and add relevant user account information. LDAP path to the directory − specify the path to the user directory.

- Click the Select button and choose a relevant container or an entire domain.
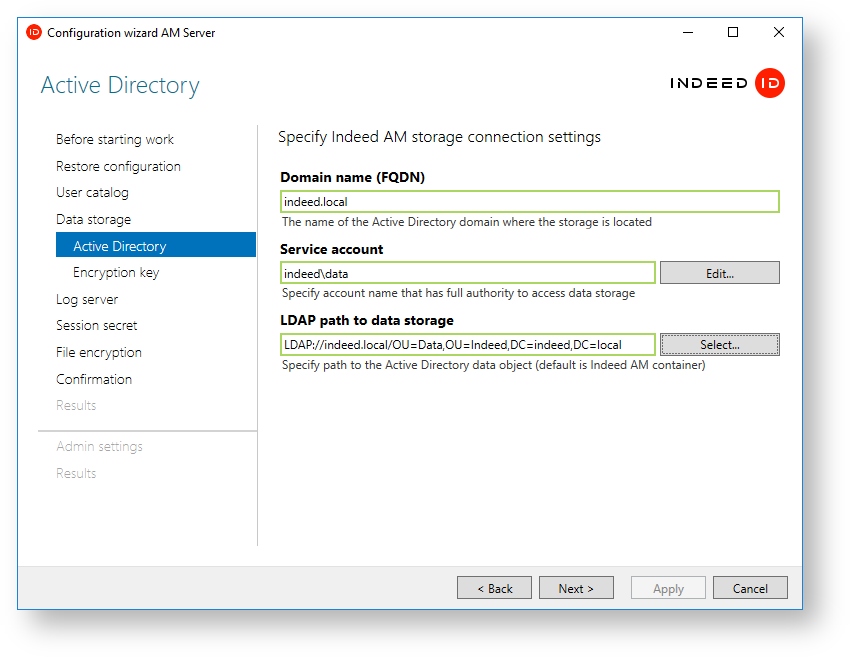
- At the Data Vault step, please select Active Directory as your storage vault.
- Domain name (FQDN) − specify full domain name, for example, domain.local.
- Service user account − specify a service user account with full access rights to the container that will be used as the Axidian data vault. Click the
 Edit button and add relevant user account information.
 - LDAP path to the directory − specify the path to the user directory. Click the Select button and choose a relevant container or an entire domain.


- The Encryption Key step. Please select the encryption algorithm, click Generate, and then click Next. Note. We strongly recommend that you create a back-up copy of your encryption key and keep it at a secure location.
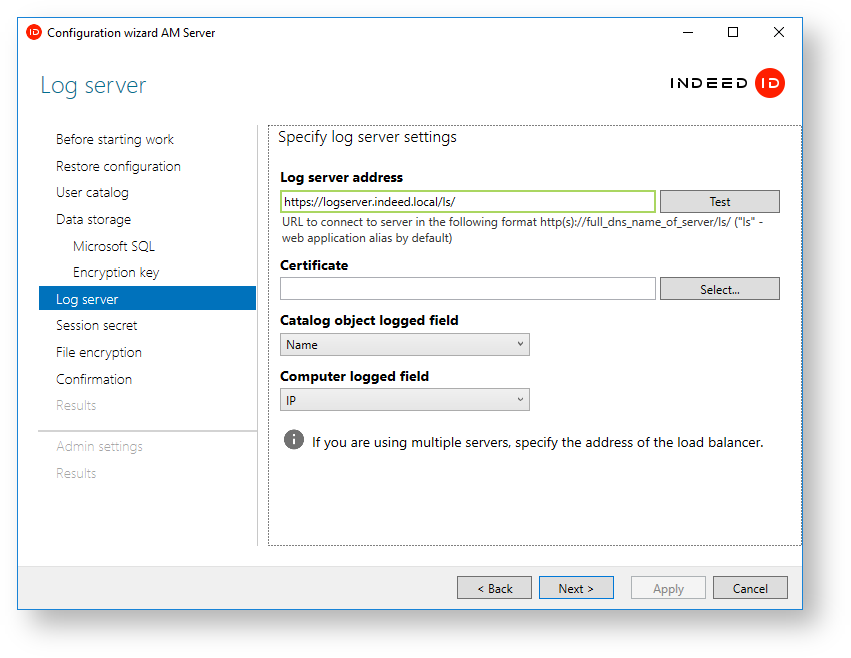
- At the Log Server step, please add the following information: Note. To avoid errors during connection testing, make sure you have completed full customization of your log server settings and have properly configured the database, or have a pre-installed EventLog component. If your log server is not ready, you can skip this step.
- Log server address − URL for server connections presented in the following format: http(s)://full_dns_server_name/ls/ (for example, http://logserver.demo.local/ls/).
- Certificate − select a certificate to set up a two-way TLS connection.
- Logged fields for objects in the catalog − specify the format for logging usernames.
Logged computer field − specify the format for logging the Computer field.
DNS logging will require additional settings.

- The Session Secret step. Create a secret for token signature by clicking Generate. After that, click Next.
The File Encryption step You have an option to encrypt configuration file settings.
We recommend encrypting the configuration file to improve security.
The Confirmation step Make sure that you have added correct data and click Apply.
We recommend making a backup copy of the configuration file. The option Save a backup copy of configuration parameters is active by default.
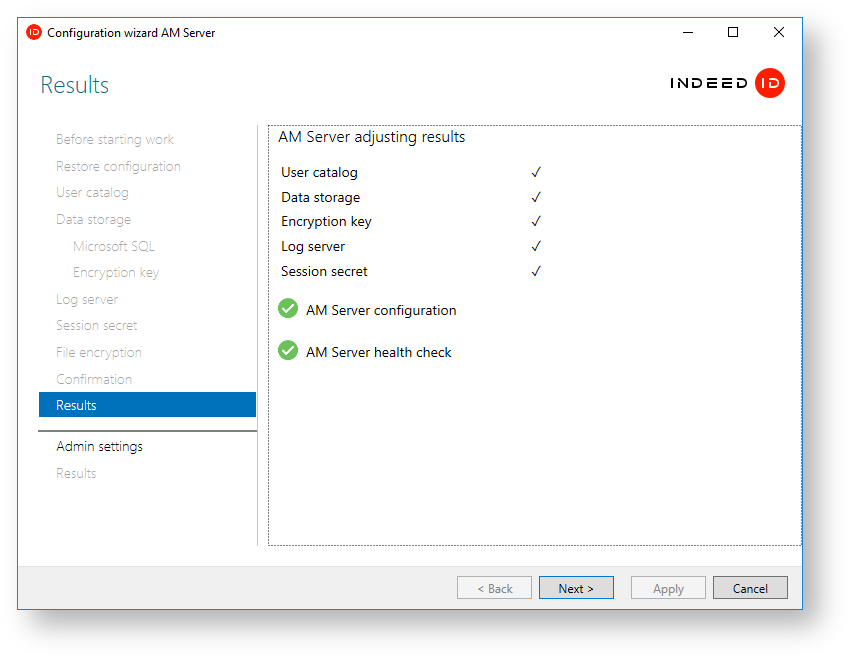
- The Results step. At this step, you can check the settings and test the Axidian AM Server connection.

How to customize the system administrator settings
The user in question has to be within the user directory.
At the System Administrator step, please select the Axidian administrator user account. This user account will be assigned primary administrator rights.
To customize the administrator settings, you will need a pre-installed Axidian AM Windows Password since assignment of primary administrator rights to a given user requires Axidian AM server authentication.
- At the Results step, you can view the status of the configuration file settings and the system administrator settings.
How to manually customize the system
Modifying a configuration file
If you want to save changes in the app configuration file, you need to use an administrator account to open the editor.
All errors that may occur during the AM server deployment (for example, errors in the configuration file) will be logged in line with the LogServer settings.
We recommend using the AM.KeyGen.exe utility to generate encryption keys. You will need to select an appropriate algorithm from the list.
If a service user password contains the following characters: &, ", <, or space, make sure to write it as follows:
When you enter a user password, replace the ampersand (&) with &. Example: password=Q1q2E3e4&.
When you enter a user password, replace double quotation marks (“) with ". Example: password=Q1q2E3e4".
When you enter a user password, replace the less-than sign (<) with <. Example: password= Q1q2E3e4<.
- Open the server configuration file named Web.config (C:\inetpub\wwwroot\am\core\Web.config).
Add a private key to sign the token of "secretKey” parameter of "logonSettings” tag. The "secretKey" parameter is used to create a user token in the "jwt” format.
Example<logonSettings secretKey="67d7e6caec61d61239dc0b05f86063ed899931b581fa1ed8140d7843b320fe02"/>
- Define the system user directory. To do so, edit the adUserCatalogProvider tag parameters:
- id is the unique identifier of the directory.
- serverName is the name of Active Directory domain, where the said directory resides.
- containerPath is the path to the container in the form of Distinguished Name or the domain itself (again as DN), if the whole of the domain is used to store users.
- userName is the name of service account used to connect to the user directory.
password is the password of the service account for the user directory in AD.
Example<adUserCatalogProviders> <adUserCatalogProvider id="UserId" serverName="axidian.local" containerPath="DC=,DC=local" userName="AxidianCatalogUser" password="Q1q2E3e4"/> </adUserCatalogProviders>
- Specify the root identifier of the provider to work with the directory. To do so, edit the rootUserCatalogProviderId attribute of userCatalogProviderSettings tag.
rootUserCatalogProviderId - set it to the value of Id attribute of adUserCatalogProvider tag.
Example<userCatalogProviderSettings rootUserCatalogProviderId="UserId">
- Define the system data storage. If Active Directory is used as data storage, edit the rootDbContextId parameter of dbContextSettings tag and adDbContext tag parameters.
- rootDbContextId is the unique value of storage identifier.
- id - set it to the value of rootDbContextId tag.
- path is LDAP path to the data container in Active Directory. It is recommended to specify it in the "serverless binding” format.
- userName is the name of service account used to connect to the storage.
password is the password of the service account for the user directory in AD.
Example<dbContextSettings rootDbContextId="mssql"> <mssqlDbContexts> <mssqlDbContext id="mssql" connectionString="Data Source=EASERVER\EASERVER;Initial Catalog=AM_Server_7;User Id=Admin- DB;Password=Q1q2E3e4;"/> </mssqlDbContexts> </dbContextSettings>
- Define the encryption key for the system data. To do so, edit the encryptionSettings tag parameters.
- cryptoAlgName specifies the encryption algorithm used.
- cryptoKey contains key values generated by the utility.
certificateThumbprint - Thumbprint of the certificate used to encrypt the key (delete the attribute, if it is not to be used).
Exemple<encryptionSettings cryptoAlgName="Aes" cryptoKey="90ce7dbc3ff94a7867abc6672c23cce2c3717d38af42f04293130cb68a34ecc2"/>
Define the system administrator. To do so, edit the userId parameter of accessControlAdminSettings tag.
The user in question has to be within the user directory.
UserId is the user identifier in the following format: “Directory identifier (rootUserCatalogProviderId); underscore; GUID of system administrator”.
GUID can be found with PowerShell command. For this, Remote Server Administration Tools component has to be installed.
ExampleGet-ADUser YouUserName -Properties * | Select ObjectGUID
- Specify the url to connect to log server. To do so, edit the logServer tag.
URL is url to connect to log server in the following format http(s)://full_dns_name_of_server/ls/api.
If several servers are used, then you have to specify the load balancer address.
- CertificateThumbprint - this is to be defined if the private key is stored in the registry, and the certificate is in the PC storage.
- CertificateFilePath - this is to be defined, if the key pair is stored in pfx.
- CertificateFilePassword is the password for pfx.
Initial configuration setup
- Open the EA.Server.AccessControlInitialConfig.exe.config file for editing.
Edit the key attribute - value parameter is to be set to true, if Windows Token is planned to be used for authentication. If the server is within the domain, you can use one of the following providers: windows password, emailOTP, smsOTP. To do so, value is to be set to false.
Example<appSettings> <add key="eaServerUrl" value="http://192.168.1.2/am/core/"/> <add key="isWindowsAuth" value="true"/> </appSettings>
- Run the EA.Server.AccessControlInitialConfig.exe utility at the domain machine under the user account, which is to become system administrator and which defined as administrator in the accessControlAdminSettings tag.

How to configure settings for multiple user directories
If you want to configure settings for multiple directories during an active Axidian system session (after granting primary rights to the system administrator) and need to change the location of the system administrator or the prefix indicated in the accessControlAdminSettings parameter, you will need to revoke all previously granted permissions and restart the primary configuration utility. To revoke permissions, delete all data from the DbAccessGroupMembers table in the Axidian database.
If your containers are located in different domains/forests, you will need to create a new user for reading container data in your domain/forest.
Add new strings to enable container connection in the adUserCatalogProviders tag.
<userCatalogProviderSettings rootUserCatalogProviderId="user">
    <userCatalogProviders>
      <sqlUserCatalogProviders></sqlUserCatalogProviders>
      <adUserCatalogProviders>
        <adUserCatalogProvider id="Ad1" serverName="demo.local" containerPath="OU=Axidian_Users,DC=demo,DC=local" userName="demo\ind-user" password="Q1q2E3e4" />
        <adUserCatalogProvider id="Ad2" serverName="demo.local" containerPath="OU=inDomainUsers,DC=demo,DC=local" userName="demo\ind-user" password="Q1q2E3e4" />
        <adUserCatalogProvider id="Ad3" serverName="inforest.demo.local" containerPath="OU=UsersInForest,DC=inforest,DC=demo,DC=local" userName="inforest\cataloguser1" password="Q1q2E3e4" />
        <adUserCatalogProvider id="Ad4" serverName="newforest.local" containerPath="OU=Usersoutforest,DC=newforest,DC=local" userName="newforest\cataloguser2" password="Q1q2E3e4" />
      </adUserCatalogProviders>
    </userCatalogProviders>
Insert orUserCatalogProviders tag with the id parameter inside the orUserCatalogProvider tag.
The id parameter should match the value of the rootUserCatalogProviderId parameter.
Insert userCatalogProviders tag inside the orUserCatalogProvider tag. Inside the userCatalogProviders tag, insert userCatalogProvider tags with id parameter indicating the user container ID and ignoreExceptions parameter set to true. This way the system will ignore connection errors when you try to connect to a directory if this directory is unavailable.
These tags may be missing in the configuration file if relevant parameters have not been specified during the previous encryption. If the tags are missing, please add them manually. The complete file structure is presented below.
<orUserCatalogProviders>
    <orUserCatalogProvider id="user">
       <userCatalogProviders>
          <userCatalogProvider id="Ad1" ignoreExceptions="true" />
          <userCatalogProvider id="Ad2" ignoreExceptions="true" />
          <userCatalogProvider id="Ad3" ignoreExceptions="true" />
          <userCatalogProvider id="Ad4" ignoreExceptions="true" />
       </userCatalogProviders>
    </orUserCatalogProvider>
</orUserCatalogProviders>
Example file structure
<accessControlAdminSettings userId="UserId_891f2b6c-9a55-4e1a-b69b-b4d6418f4c4c"/>
  <logonSettings secretKey="*****"/>
  <userCatalogProviderSettings rootUserCatalogProviderId="user">
    <userCatalogProviders>
        <sqlUserCatalogProviders>
        </sqlUserCatalogProviders>
        <adUserCatalogProviders>
            <adUserCatalogProvider id="UserId" serverName="new.loc" containerPath="DC=new,DC=loc"
                userName="axidian-users" password="Q1q2E3e4" />
            <adUserCatalogProvider id="UserId1" serverName="test.new.loc" containerPath="DC=test,DC=loc"
                userName="axidian-users" password="Q1q2E3e4" />
        </adUserCatalogProviders>
    </userCatalogProviders>
    <combineRules>
        <orUserCatalogProviders>
            <orUserCatalogProvider id="user">
               <userCatalogProviders>
                  <userCatalogProvider id="UserId" ignoreExceptions="true" />
                  <userCatalogProvider id="UserId1" ignoreExceptions="true" />
               </userCatalogProviders>
            </orUserCatalogProvider>
        </orUserCatalogProviders>
        <andUserCatalogProviders>
        </andUserCatalogProviders>
    </combineRules>
  </userCatalogProviderSettings>
Encryption / decryption of configuration file.
- Run command line as Administrator.
In command line, switch to encryption utility folder.
The utility encrypts the following sections: logServer, logonSettings, userCatalogProviderSettings, encryptionSettings, dbContextSettings. It is recommended to encrypt all the sections.
Encryption / decryption of separate sections.
To encrypt a separate section, you have to execute the following command: EA. Config.Encryptor /encrypt "Path to server configuration file" "Section name”
ExampleEA.Config.Encryptor /encrypt "C:\inetpub\wwwroot\am\core\Web.config" "logServer"
To decrypt a separate section, you have to execute the following command: EA. Config.Encryptor /decrypt "Path to server configuration file" "Section name”
ExampleEA.Config.Encryptor /decrypt "C:\inetpub\wwwroot\am\core\Web.config" "logServer"
Encryption/decryption of all sections.
- To encrypt all sections, run encryptConfigs.bat.

- To decrypt all sections, run decryptConfigs.bat.


- No labels