Indeed PAM Gateway
Компонент The Indeed PAM Gateway устанавливается на сервер Узел сеансов удаленных рабочих столов (component is installed onto Remote Desktop Session Host). Если серверов RDSH несколько, то Indeed PAM Gateway должен быть установлен на каждый server. If there are several RDSH servers, then the Indeed PAM Gateway has to be installed onto each of them.
| Warning | ||
|---|---|---|
| ||
Все URL указываются в нижнем регистре. | ||
All URLs are specified in lowercase. |
Switch to Перейдите в каталог C:\Program Files\Indeed PAM\Gateway\ProxyApp и отредактируйте файл folder and edit Pam.Proxy.App.exe.config file:
<pamProxy ... />:
- ApiUrl - URL of Indeed PAM Core
- IdpUrl - URL of Indeed PAM IdP
GatewaySecret - Secret for client keys for additional component authentication
Note icon false The secret and its hash are generated by the console utility Pam.ConsoleApp.exe (located in \Misc\ConsoleApp folder). Run the command prompt, go to the "ConsoleApp" folder and run the command "Pam.ConsoleApp.exe generate-secret"
Code Block theme RDark D:\ConsoleApp>Pam.ConsoleApp.exe generate-secret Secret: OClhdGA1M6wWFcYflCfF1qINX8dYbvTrU0Aad4cb7piASoMEEiB2yM0I8N6zq7T/FSQunLyYzsRcm3PhQzqM9w== Hash: bQAl17Y58+Htv982eadHmFaDguAPNrjd+Bl9vN0Uw5c= Done.Warning icon false The hash will need to be specified when setting up Indeed PAM IdP.
- IdpRequiresHttps - to require secure connection
- IdpRequiresHttps - требовать защищённое подключение
Leave the rest unchanged
Code Block language xml <pamProxy ApiUrl="https://pam.indeed-id.local/api" IdpUrl="https://pam.indeed-id.local/idp" GatewaySecret="OClhdGA1M6wWFcYflCfF1qINX8dYbvTrU0Aad4cb7piASoMEEiB2yM0I8N6zq7T/FSQunLyYzsRcm3PhQzqM9w==" IdpRequiresHttps="true" AgentConnectionTimeout="60" AgentHeartbeatTimeout="20" VideoTempPath="C:\ProgramData\Indeed\Pam\VideoTemp\" FileCopyMaxPercentToIgnore="1" FileCopyEnoughPercentToSave="50" FileCopyMinBytesToSave="1048576" />
<appSettings>...</appSettings>
Edit the "Culture" value to change the user interface language:
Code Block language xml <appSettings> <add key="Culture" value="en" />
</appSettings>
Configuration of session collection
- Log in to the server that performs
Настройка коллекции сеансов
- Выполните вход на сервер с ролью Посредник подключений удаленного рабочего стола (Remote Desktop Connection Broker) и запустите Диспетчер серверов ( role and run Server Manager)
- Switch to Перейдите в пункт Служба удалённых рабочих столов (Remote Desktop Services) - Коллекции (Collections)
- In the Collections section click Tasks and select the В разделе Коллекции (Collections) нажмите Задачи (Tasks) и выберите пункт Создать коллекцию сеансов (Create session collections)
- Завершите работу мастера по созданию коллекции с необходимыми вам настройками.
- В разделе Удалённые приложения RemoteApp (RemoteApp Programs) нажмите Задачи (Tasks) и выберите пункт Опубликовать удалённое приложение RemoteApp (Publish RemoteApp Programs)
- item
- Create a collection with parameters you need using the wizard
- Click Tasks in the RemoteApp Programs section and select Publish RemoteApp Programs item
- Click Add, select the Нажмите Добавить (Add), выберите приложение C:\Program Files\Indeed PAM\Gateway\ProxyApp\Pam.Proxy.App.exe application, нажмите Далее (Next) и Опубликовать (Publish).
- В разделе Удалённые приложения RemoteApp (RemoteApp Programs) откройте контекстное меню опубликованного приложения и выберите пункт Изменить свойства (Edit Properties).
- click Next and then Publish
- Open the context menu of the published application in the RemoteApp Programs section and select Edit Properties item
- Switch to Parameters, mark the Перейдите в пункт Параметры (Parameters), установите опцию Разрешить любые параметры командной строки (Allow any command-line parameters) и нажмите Ок.
Настройка доступа к web приложениям
Установка- option and click ОK
Configuration of access to web applications
Installation of Indeed-Id ESSO Agent/Admin Pack
Для доступа к web приложениям через Indeed PAM потребуется установка дополнительных компонентов To access web applications through Indeed PAM, you will need to install additional Indeed-Id components:
- Indeed-Id Admin Pack
- Indeed-Id ESSO Agent
- Расширение для браузераBrowser extensions
| Warning | ||
|---|---|---|
| ||
|
Настройка расширения для Internet Explorer через групповые политики
|
Configuring the Internet Explorer extension via group policies
After После установки Indeed-Id ESSO Agent в is installed, the extension is automatically added to Internet Explorer будет автоматически добавлено расширение, но оно будет выключено. Для автоматического включения и настройки расширения потребуется:, but it is disabled. To enable and configure extension automatically, proceed as follows:
- Run the Group Policy Management snap-in, select the domain, then open the context menu of Group Policy Objects item and click New or use an existing group policy object.
- Switch to Group Policy Objects, open the context menu of an object and click Edit
Switch to
- Запустите оснастку Управление групповой политикой (Group Policy Management), выберите домен, откройте контекстное меню пункта Объекты групповой политики (Group Policy Objects) и выберите Создать (New) или используйте уже имеющийся объект групповой политики.
- Перейдите в Объекты групповой политики (Group Policy Objects), откройте контекстное меню объекта групповой политики и выберите Изменить (Edit).
Перейдите
Tip icon false Конфигурация компьютера\Политики\Административные шаблоны\Компоненты Windows\Internet Explorer\Средства безопасности\Управление надстройками
(Computer Configuration\Policies\Administrative Templates\Windows Components\Internet Explorer\Security Features\Add-on Management)- Установите переключатель на Включено (Enabled) и нажмите Показать (Show) в разделе Параметры (Options).
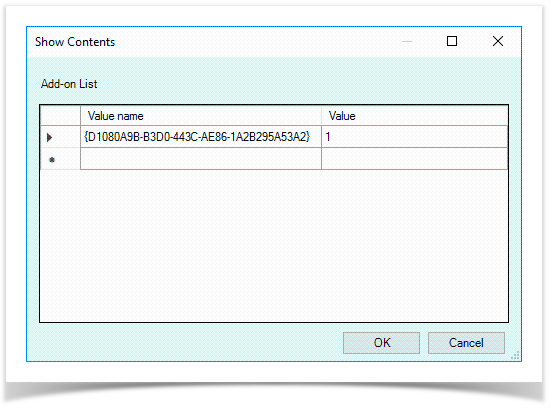
- Open the Add-on List parameter, set the switch to Enabled and click Show in the Options section
- В поле Имя значения (Value name) введите ID расширения Specify the extension ID {D1080A9B-B3D0-443C-AE86-1A2B295A53A2}, в поле Значение (Value) введите 1 и сохраните изменения. in the Value name field. Enter 1 in the Value field and save the changes
ПерейдитеSwitch to
Tip icon false Конфигурация компьютера\Политики\Административные шаблоны\Компоненты Windows\Internet Explorer\Панель управления браузером\Вкладка "Безопасность"
(Computer configuration\Policies\Administrative Templates\Windows Components\Internet Explorer\Internet Control Panel\Security Page).- Откройте параметр Список назначений зоны для веб-сайтов (Open the Site to Zone Assignment List), установите переключатель на Включено (Enabled) и нажмите Показать (Show) в разделе Параметры (Options).
- В поле Имя значения (Value name) введите URL узла, на котором расположено веб приложение, в поле Значение (Value) введите 2 и сохраните изменения.
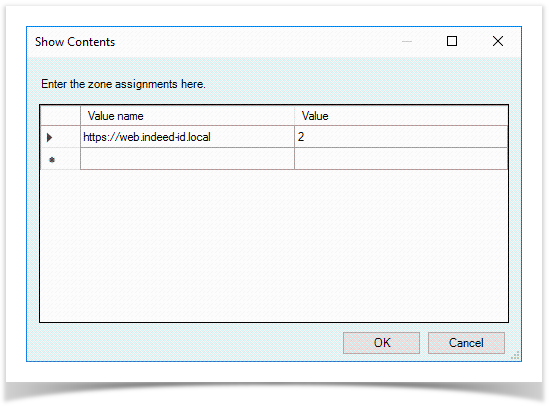
- parameter, set the switch to Enabled and click Show in the Options section
- In the Value name field, enter the URL of the host on which the web application is located, in the Value field enter 2 and save the changes
Switch toПерейдите
Tip icon false Конфигурация компьютера\Политики\Административные шаблоны\Компоненты Windows\Internet Explorer\Панель управления браузером\Вкладка "Дополнительно"
(Computer configuration\Policies\Administrative Templates\Windows Components\Internet Explorer\Internet Control Panel\Advanced Page).- Откройте параметр Разрешить сторонние расширения браузера (Open the Allow third-party browser extensions), установите переключатель на Включено (Enabled) и сохраните изменения.Откройте параметр Включить усиленный защищённый режим ( parameter, set the switch to Enabled and save the changes
- Open the Turn on Enhanced Protected Mod), установите переключатель на Отключено (Disabled) и сохраните изменения.Mode parameter, set the switch to Disabled and save the changes
- Закройте Редактор управления групповыми политиками (Close the Group Policy Management Editor)
- Вызовите контекстное меню домена или подразделения, нажмите Связать существующий объект групповой политики (Open the context menu of domain or unit, click Link an Existing GPO), выберите объект групповой политики и настройте его на работу с сервером , select a group policy object and configure it to work with Indeed PAM Gateway .server
- Log in to Выполните вход на сервер Indeed PAM Gateway и запустите Диспетчер серверов (server and run Server Manager).
- Перейдите в пункт Локальный сервер (Local Server) и откройте опцию Конфигурация усиленной безопасности Internet Explorer (Switch to Local Server item and open Internet Explorer Enhanced Security Configuration).
- Для групп Администратора (Administrators) и Пользователи (Users) установите переключатель на Выключено (Off).
- option
- Set the switch to Off for Administrators and Users groups
Configuring the Google Chrome extension via group policies
| Warning | ||
|---|---|---|
| ||
Распространение расширения для Google Chrome через групповые политики возможно только при установке Distribution of Google Chrome extension via group policies is only possible if Indeed-Id ESSO Agent при помощи файла is installed with Install2.bat. Также, для распространения расширения потребуется сервер с ролью Also, a server with Internet Information Services (IIS) .role is required to distribute the extension. |
- Выполните вход на сервер c ролью Log in to Internet Information Services (IIS) role server, перейдите в switch toC:\initpubinetpub\wwwroot\ и создайте каталог ChromeExtension. and create a folder named ChromeExtension
- Запустите Диспетчер служб IIS (Run Internet Information Services (IIS) Manager ) и раскройте пункт Сайты (Sites) в разделе Подключения (Connections).
- Откройте контекстное меню сайта Default Web Site или любого другого сайта и выберите Добавить приложение (Add Application).
- and open Sites item in the Connections section
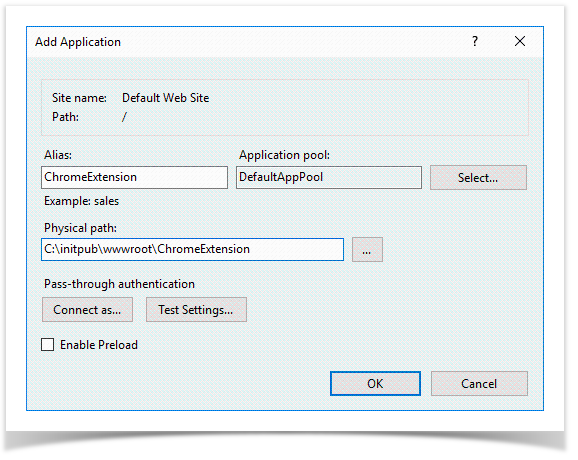
- Open the context menu of Default Web Site or any other site and click Add Application
- В поле Псевдоним (Alias) введите ChromeExtension, в поле Физический путь (Physical path) введите Specify ChromeExtension in the Alias field. Enter C:\initpub\wwwroot\ChromeExtensionи сохраните изменения.
- Выберите сайт, в котором было создано приложение ChromeExtension, откройте Типы MIME (MIME Types) в разделе IIS и нажмите Добавить (Add) в разделе Действия (Actions).
- В поле Расширение файла (File name extension) введите .crx, в поле Тип MIME (MIME Type) введите application/chrome и сохраните изменения.
- to Physical path field, then save the changes
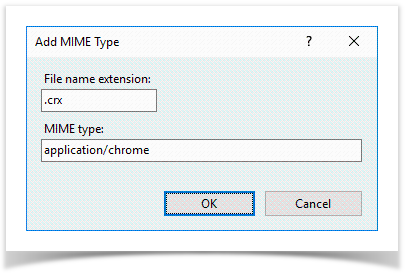
- Select the site where ChromeExtension application is created, open MIME Types item in the IIS section, then click Add in the Actions section
- Specify .crx in the File name extension field. Specify application/chrome in the MIME Type field and save the changes
Send the URL of ChromeExtension application to support@indeed-id.comПришлите в службу поддержки support@indeed-id.com URL приложения ChromeExtension.
Note icon false ПримерExample: https://server.indeed-id.local/ChromeExtension
- Откройте каталог Open the C:\initpub\wwwroot\ChromeExtension и поместите в него файлы файлы полученные от службы поддержки folder and place the files received from the support service to it:
- Update.xml
- icpjelgegalmjjkfoilkbeeodgfbcaam.crx
- Выполните вход на контроллер домена и выполните установку ADMX шаблонов, они входят в состав дистрибутива и расположены в каталоге Install the ADMX templates to domain controller. The templates are included to installation package and located in the IndeedPAM\IESSO\IndeedID.SSO.Agent\Chrome\PolicyTemplates\ADMX
- Запустите оснастку Управление групповой политикой (Run the Group Policy Management), выберите домен, откройте контекстное меню пункта Объекты групповой политики (Group Policy Objects) и выберите Создать (New) или используйте уже имеющийся объект групповой политики.
- Перейдите в Объекты групповой политики (Group Policy Objects), откройте контекстное меню объекта групповой политики и выберите Изменить (Edit).
- snap-in, select the domain, then open the context menu of Group Policy Objects item and click New or use an existing group policy object
- Switch to Group Policy Objects, open the context menu of an object and click Edit
Switch toПерейдите
Tip icon false (Computer Configuration/Administrative Templates/Google/Google Chrome/Extensions).
- Откройте параметр Создать список приложений и расширений, устанавливаемых принудительно (Open the Configure the list of force-installed apps and extensions), установите переключатель на Включено (Enabled) и нажмите Показать (Show) в разделе Параметры (Options)., set the switch to Enabled and click Show in the Options section
Specify the ID of icpjelgegalmjjkfoilkbeeodgfbcaam extension in the Value name field, as well as URL of update.xml file and save the changesВ поле Значение (Value name) введите ID расширения icpjelgegalmjjkfoilkbeeodgfbcaam и URL, по которому доступен файл update.xml, сохраните изменения.
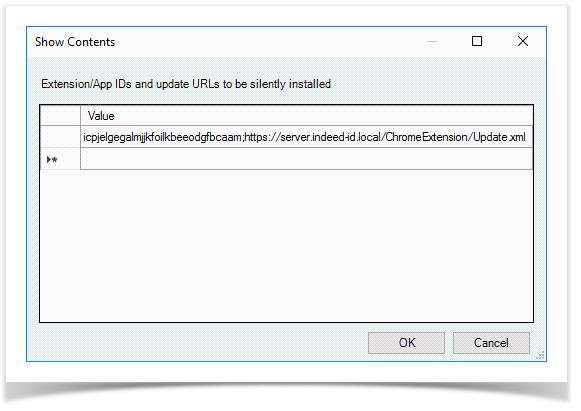
Note icon false Разделителем между ID приложения и URL является точка с запятойThe separator between the application ID and the URL is a semicolon.
icpjelgegalmjjkfoilkbeeodgfbcaam;https://server.indeed-id.local/ChromeExtension/Update.xmlОткройте параметр Настроить источники для установки расширений, приложений и пользовательских скриптов (Open the Configure extension, app, and user script install sources), установите переключатель на Включено (Enabled) и нажмите Показать (Show) в разделе Параметры (Options)., set the switch to Enabled and click Show in the Options section
Specify the URL of the host In the Value name field where ChromeExtension web application is located and save the changesВ поле Значение (Value name) введите URL узла, на котором расположено веб приложение ChromeExtension и сохраните изменения.
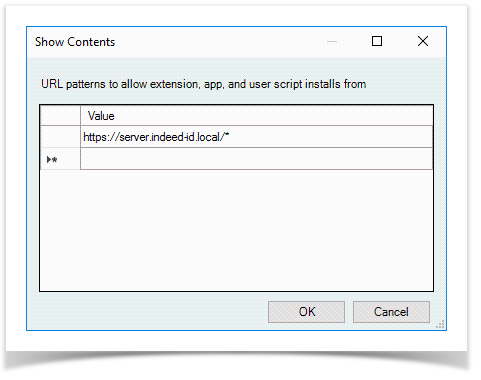
Note icon false The URL must end with an asteriskURL должен заканчиваться символом - звёздочка.
https://server.indeed-id.local/*- Закройте Редактор управления групповыми политиками (Close the Group Policy Management Editor)
- Вызовите контекстное меню домена или подразделения, нажмите Связать существующий объект групповой политики (Open the context menu of domain or unit, click Link an Existing GPO), выберите объект групповой политики и настройте его на работу с сервером Indeed PAM Gateway., select a group policy object and configure it to work with Indeed PAM Gateway server
| Backtotop | ||||
|---|---|---|---|---|
|
| Divbox | ||||
|---|---|---|---|---|
| ||||
|